docker和rockylinux或debian直接安装nextcloud+redis+mysql
系统准备期间 rockylinux8.6
安装依赖工具:
1 | yum install -y yum-utils device-mapper-persistent-data lvm2 |
添加源:
1 | yum-config-manager --add-repo https://mirrors.aliyun.com/docker-ce/linux/centos/docker-ce.repo |
更新并安装Docker-CE
1 | yum makecache |
启动docker
1 | systemctl start docker |
检查docker
1 | docker version |
运行容器,开始安装
运行redis
1 | docker run -itd --restart=always --name redis1 -p 6379:6379 redis |
运行mysql
1 | docker run -d --restart=always --name mysql_db -e MYSQL_ROOT_PASSWORD=root_password -e MYSQL_DATABASE=nextcloud -e MYSQL_USER=nextcloud -e MYSQL_PASSWORD=nextcloud -v /home/docker/mysql:/var/lib/mysql mysql:latest |
运行nextcloud
1 | docker run -d --restart=always --name nextcloud1 --link mysql_db --link redis1 -v /home/docker/nextcloud:/var/www/html -p 8080:80 nextcloud |
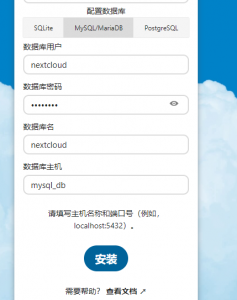
nextcloud 数据库配置
配置redis
1 | 'memcache.local' => '\\OC\\Memcache\\APCu', |
添加定时执行任务
1 | crontab -e |
nextcloud 设置一下,整个过程旧完成了 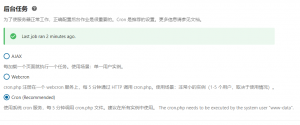
nextcloud 开启文件目录扫描
手动扫描
在命令行使用 php occ files:scan –all 手动扫描。在 docker 中执行需要用:
1 | su -s /bin/bash -c "php /var/www/html/occ files:scan --all" -g users www-data |
其中 -g 后的参数依次为分组名和用户名。
修改 config.php 自动扫描
1 | 'filesystem_check_changes' => true |
开启ssl支持
进入容器后执行下面命令
1 | a2enmod ssl |
生成自己的证书
1 | openssl genrsa -out test.com.key 2048 |
Debian11 直接安装配置
配置soucres.list源
安装debian后,第一件事就是更改soucres.list源
1 | # deb cdrom:[Debian GNU/Linux 11.5.0 _Bullseye_ - Official amd64 NETINST 20220910-10:38]/ bullseye main |
升级到最新的源 apt update apt upgrade -y
安装基础包
apt-get install ca-certificates apt-transport-https software-properties-common wget curl lsb-release gnupg unzip -y
加入php源
curl -sSL https://packages.sury.org/php/README.txt bash -x
定义$PATH路径
nano ~/.bashrc export PATH=$PATH:/usr/local/sbin:/sbin
安装mysql
wget https://repo.mysql.com//mysql-apt-config_0.8.24-1_all.deb dpkg -i mysql-apt-config_0.8.24-1_all.deb apt update apt install mysql-server
安装php8
apt install php8.0 php8.0-mysql php8.0-gd php8.0-dom php8.0-xml php8.0-mbstring php8.0-curl php8.0-zip php8.0-imagick php8.0-intl php8.0-redis php8.0-gmp php8.0-apcu php8.0-bcmath
安装nextcloud
cd /var/www/html wget http://xxx/nextcloud.zip unzip nextcloud.zip mv nextcloud/* . mv nextcloud/.htaccess . chown -R www-data:www-data .
开启apache伪静态
1 | a2enmod rewrite |
配置缓存
编辑config,添加以下内容 ‘memcache.local’ => ‘\OC\Memcache\APCu’, ‘memcache.locking’ => ‘\OC\Memcache\Redis’, ‘redis’ => [ ‘host’ => ‘127.0.0.1’, ‘port’ => 6379, ],
apt install redis-server systemctl enable redis-server
配置php.ini
编辑php.ini,修改下面选项 memory_limit = 512M max_execution_time = 300 max_input_time = 600 post_max_size = 100M upload_max_filesize = 100M output_buffering = 0
一些安装后的报错解决方案
此实例中的 php-imagick 模块不支持 SVG。为了获得更好的兼容性,建议安装它
apt install libmagickcore-6.q16-6-extra
PHP 模块 “gmp” 和/或 “bcmath” 未被启用。如果你使用 WebAuthn 无密码验证,这些模块是必需的。
apt install libgmp-dev bc
您的安装没有设置默认的电话区域。这对验证配置设定中没有国家代码的电话号码而言是必需的。
1 | # config/config.php |
“Strict-Transport-Security” HTTP 头未设为至少 “15552000” 秒。为了提高安全性,建议启用 HSTS,参考步骤见 安全小贴士
1 | a2enmod headers |
OCP\HintException: [0]: Memcache \OC\Memcache\APCu not available for local cache (Is the matching PHP module installed and enabled?)
解决方法是开启apcu命令行,在/etc/php/7.4/fpm/conf.d/20-apcu.ini 文件中末尾添加
1 | apc.enable_cli=1 |